I have made significant progress on several home improvement projects, not only to procrastinate on finishing hiding threads on the quilt…but oh well. The crafting content will be after the ***** if you want to skip to that.
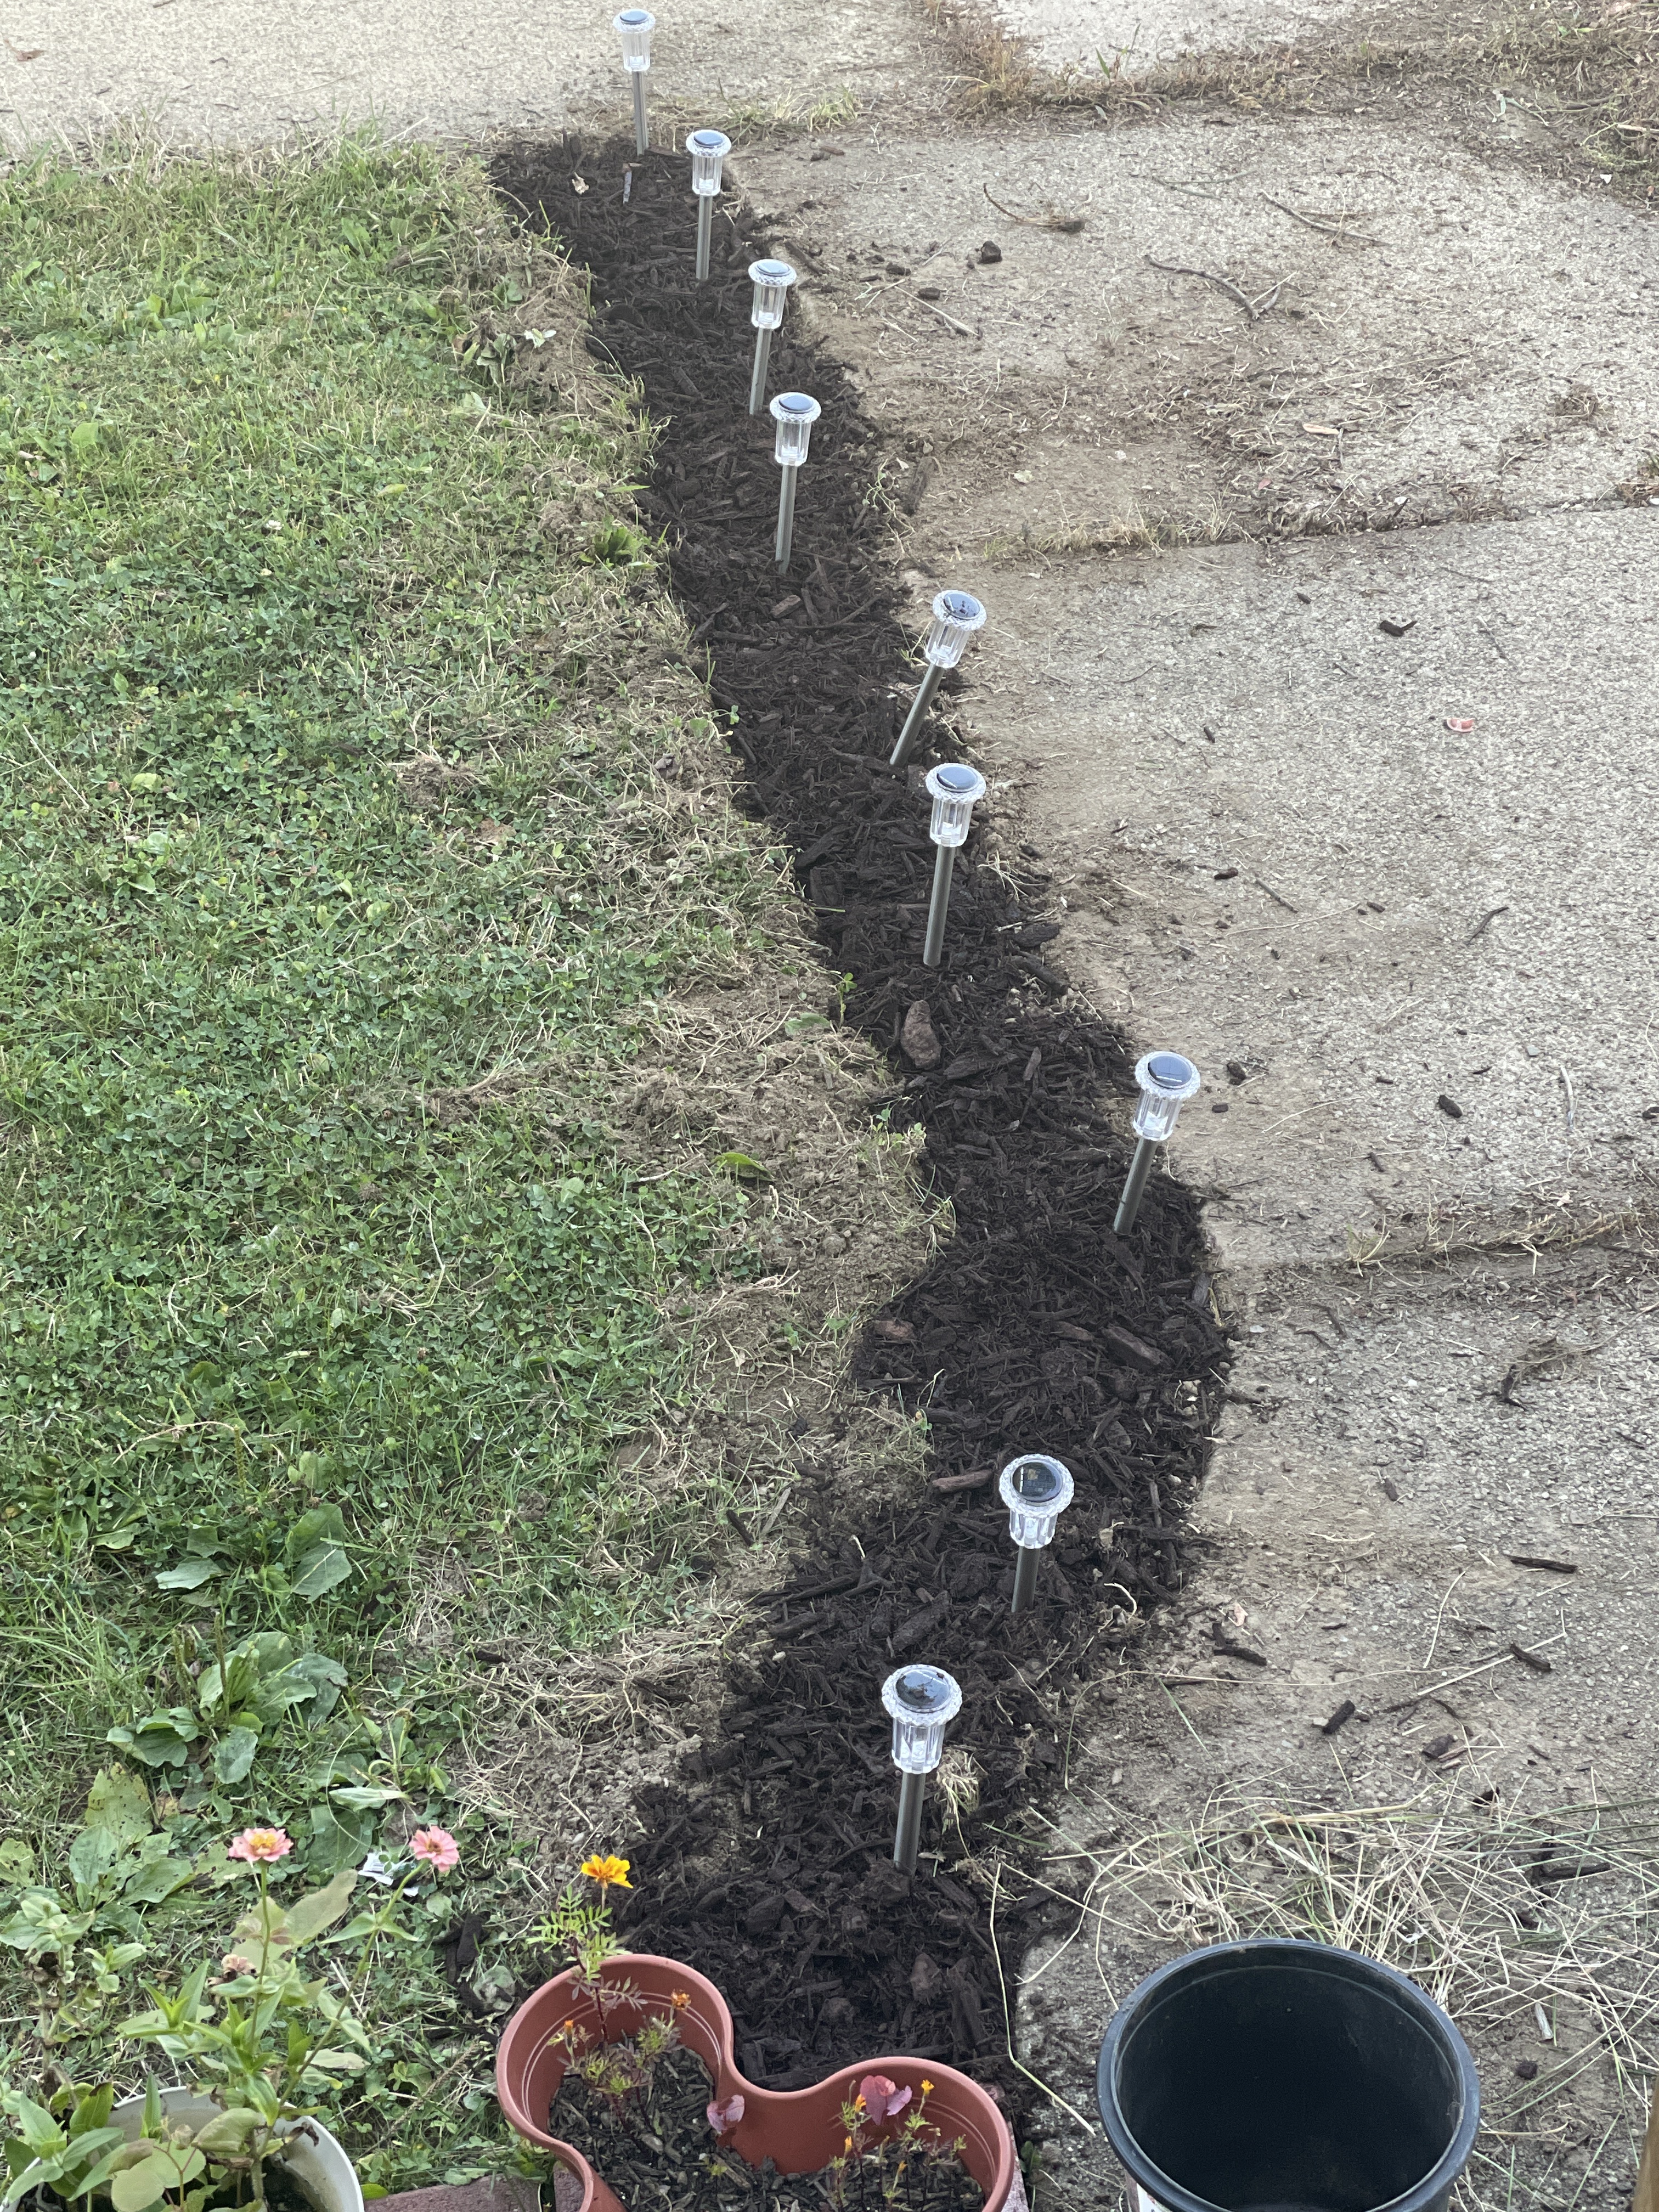
I finished making my lighted walkway look a bit better. In about an hour I used a tined weed remover to loosen the grass and dirt along the path. After that I removed the grass and put it on my compost pile, the dirt went into some flower pots that were lacking in soil, I’ll see if I can plant something there next year. After that I used black weed preventing cloth that I staked down with my lights. After the cloth was laid down I added the rest of the lights and a bag of brown mulch. My grass doesn’t look bad enough for me to worry about mowing so I’m not going to bother just yet.
I am still working on getting rid of the grass between my sidewalk slabs, so please ignore that. I did try to get some of the spaces on my front porch fixed up, I’m going to wait a bit to see if it looks better before I take photos. I did another two hours of sanding on my back porch. I like how the porch is looking so far. I did some filler on the other railing and sanded down the first set of filler.
I know, it doesn’t look like much but this was significant progress for 2 hours work. I’m hoping to finish sanding either this week or during my vacation next week.
*********************************** I did manage to get some crafting accomplished this week. About half of the threads are hidden on my quilt and I figured out how to easily thread the needle to hide the rest. I experimented with some inexpensive templates I purchased from Amazon. I tried to use a pen like knife to cut the card stock, but it didn’t work. Due to that I traced the inside template piece with a yellow marker to maximize the piece of paper, the yellow is very hard to see in a photo.
Once I had the traced them out I used scissors to cut out each shape. Later I am going to have to use the larger outer template to cut the fabric. I will be using a rotary cutter, being very careful to not cut myself.
I have been messing about with a few other things but I’m going to wait a little bit before revealing anything further at this time.
Until next time remember to Live Life a Little More Abstract.
This post contains some affiliate links. Clicking on the links and making a purchase will not cost you anything extra but I may get a small stipend.
The DIY bug bit me hard this weekend, combined with realizing that the quilt I’m working on has 6 types of blocks not 5, means that there will not be any crafting content this week. I will be writing about home repairs and the products that I used/recommend to accomplish these tasks.
I did not manage to get any more paper made, I did manage to get some home renovations complete, however. When I first purchased this house the garage was a bit of a mess. Since this house was built in the early 1900s the garage was an afterthought. This means that without back-up cameras getting in and out of the garage would be a nightmare, and my old car did not have back up cameras. Even now that I have the cameras I’m still not planning on using the garage for car storage. All of this to tell you that the busted out pane of glass, hole in the back wall, and door that does not sit flush were the least of my concerns 2 years ago when I closed on the house. Now that I have several of the inside projects completed or handled in some way, I can turn to the garage…though I still need to find someone to patch my roof I’m going to hope it holds out for another year.
I managed to ‘fix’ the pane of glass…if you do not have experience cutting glass and have been working with fabric where you need to lean on the ruler to make sure it does not shift…don’t take this task on alone or get the pane professionally cut, or better yet just buy the right size of glass to begin with if you can find it!
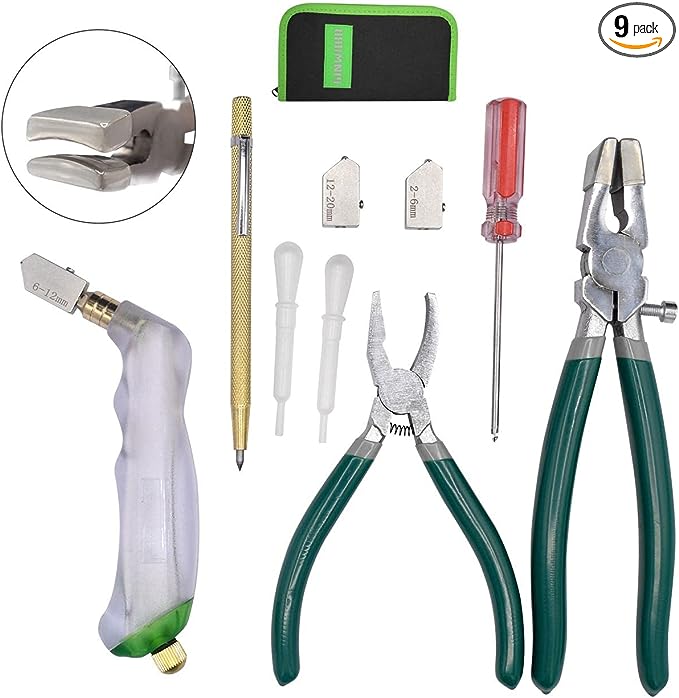
To start with I obtained a piece of glass, that turned out too small, so the first step needs to be measure your window pane. If you can find the correct size glass, purchase it. If you cannot find the correct size then you need to either purchase one that is bigger and cut it down to size using a glass cutting set, this is the one I should have purchased
Brush away any extra dust or debris, wipe the frame down if there is no glass in it, or pick out any glass remaining being careful to not get cut. Wearing cut proof gloves,
is probably a good idea for this step and any steps where you are playing with sharp edges.
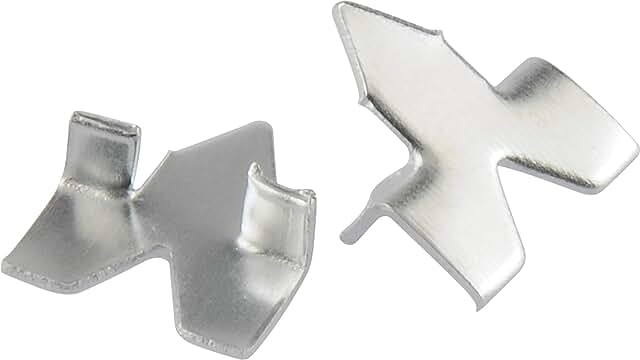
Push the Glazing points into the window frame flush with the back where the glass pane will sit. The pointy bit goes into the frame and the sticky outy bits needs to be facing you to hold teh .
Next fit the frame of glass into place, making sure that the fit is snug.
Once you have the glass in place use the window glazing compound around the edges to seal the pane in place and prevent water from getting into the wood. I ran a line around then used a putty knife
I prefer a metal edge, to smear the compound toward the outer edges helping it seal better. Within a day or two it should be dry…as long as you don’t do this in the rain…don’t do this in the rain!
My fix will work for a year or two, and then I’ll get a pane of properly sized glass and take out my mess. I might just see if I can install a new window altogether, but that seems a little to ambitious right now. It does not look pretty (at all) but it should keep the wind, and more importantly cats, out.
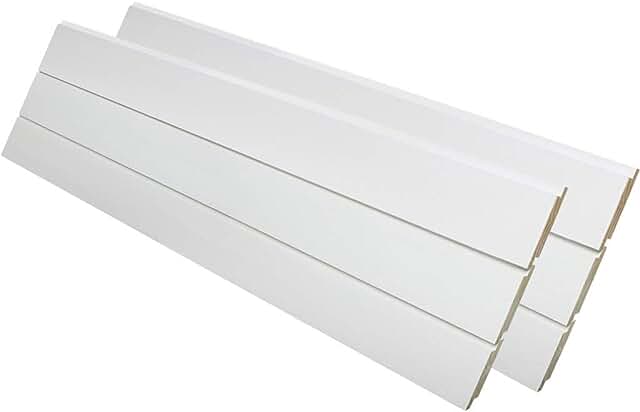
The link is to some primed shiplap which would have saved me some time since what I purchased needs finished. Once I have the Shiplap cut down to size I will need to seal it
to nail the boards into place covering the hole. I am not sure what I did before I had a nail gun!
Of course in addition to all of this I decided that August is the perfect time to do all of the home improvement projects, so I will also be sanding off the spray paint I used on my steps last year. Well, I say I’m sanding it off but most if it has peeled off already but there is some stubborn spots. After talking with someone that works in a home improvement store I decided against a cordless variety and I purchased
to help me get the back steps as well as my front porch prepped to be finished. I hope to get the back steps done by the end of the week, and work on the front porch while I’m on vacation the first full week of September. That is about it for home improvement projects this past week, though I’ll post progress photos on my back steps if I make any progress, though they are calling for rain most of this week.
Until next time remember to Live Life A Little More Abstract!
Hello Everyone! The first part is information about my mental health so if you want to skip to the crafting content skip to the ****************.
My site and store have not been updated in a few weeks due to a slight adjustment in my anti-depressants (anti-anxiety for me) and the time at which I was taking them. I was taking them in the morning, this resulted in my consuming more caffeine to keep myself awake and not taking my ADHD medication (which is a stimulant). By changing my anti-depressants to evening I am able to sleep better and not spend my entire day trying to stay awake, I am also taking my ADHD daily to see the difference it makes. After half a week I have more energy and I am able to better focus on accomplishing various tasks.
I also had a friend visit to see my new house for the first time, it was so much fun to catch up with her!
My new desk has re-ignited my desire to ensure that my first floor work area is optimized, or at least I can access everything I need. This of course means that I have to move everything out into the open before I can store it away. I did find my shuttle tatting supplies about 6 weeks before I am set to teach needle tatting to a guild, so that is going to be great to demonstrate the difference between the techniques. Right now the room looks a fright, I did manage to finish weaving off the warp I had set up for coasters that I plan on giving to the guild as prizes for the EGLFC (Eastern Great Lakes Fiber Conference) in October. This allowed me to push that loom to a wall and put items that I use more frequently in front of it.
There is a cubby that I built years ago, not very well admittedly, that had been against a wall but hidden with items in front of it. That is now next to the loom against the wall, mostly accessible. There are 3 cubbies that have longer term storage items that I placed a small end table against. I then pushed my desk up against that end table to create a seamless corner of work space, where I can still access most of the cubbies, that I feel will be very functional.
These moves allowed me to better access my 16 shaft table loom, which brings me to one of the reasons why I started all of these adjustments. Mirrix Looms had a program where they invited everyone to weave every day in April. It was such a success they decided to bring it back in July. This has resulted in my spending the first three days of July finishing off the coasters, so I could put that loom away, and making my 16 shaft loom more accessible. Much earlier this year I put the warp for some towels through my reed, and found out that despite what I thought my warp is wide enough to fill the entire loom…this means that I need to go back and start at the beginning to rethread my entire reed. I thought I could ignore this and just leave the extra threads off of the warp, so I began threading the heddles, however the truth is if I do that I will always hate these towels. I checked with Mirrix and warping up my 16 shaft loom does count as ‘weaving’ toward their goal. I do understand how ridiculous all of this sounds, however I need that external motivation to get myself working on this huge project.
All of this does not mean that this is all that I have been working on! Last Monday I taught a guild how to make scissor fobs, and I will be repeating the lesson with another guild this Saturday and yet again on the 22nd. The first class was such a success I am very excited to see what creations the other guilds come up with given the supplies available! I purchased a lot of supplies for these scissor fobs and I am hopeful that I will get the supplies cost back so I can invest in teaching another class next year, though I am not sure what in yet.
If you have not gotten the gist yet, I never have just one or two projects on the go at a time. I have also been doing some work on my house, my front garden is planted with new blocks for my potted plants, they are a dye garden plus a couple of vegetables, so I look forward to seeing what hues I get out of my garden this year. I’ll try to get a good photo of my straw flowers by next post. I also went a little too far at the 70% off fabric sale at JoAnn Fabrics, though I hope to make a couple of lap quilts in the next week or so, yes I know I’m getting a bit too ambitious again!
I think that is all of the progress I have to report on for now, if I like how the workroom looks by time I’m finished I’ll try to add a photo to this post. I’ll probably have a post about organization products I use in my house in time for the Prime Sale on Amazon with affiliate links by next week. Clicking on the affiliate links will not cost you anything but I might get a small stipend.
Until Next Time Remember to Live Life a Little More Abstract!